In today’s digital age, laptops have become an essential tool for work, study, and entertainment. With the increasing amount of time we spend using our laptops, it’s important to personalize and customize our user interfaces to enhance our productivity and overall computing experience. One of the key customization features that every laptop user should know is how to customize the taskbar.
The taskbar serves as the central hub for accessing various applications and functions on a laptop. By customizing the taskbar, you can easily access your frequently used programs, pin important documents or shortcuts, and even change the appearance to reflect your personal style. In this article, we will explore the step-by-step process of customizing the taskbar on your laptop, allowing you to optimize your workflow and make the most out of your device.
Changing the Taskbar Position
The taskbar on a laptop is a crucial element of the operating system that allows you to easily navigate through various applications and system settings. By default, the taskbar is usually positioned at the bottom of the screen, but did you know that you can customize its position according to your preference? This article will guide you on how to change the taskbar position on your laptop.
1. To the Top
If you prefer having the taskbar on the top of your screen, follow these steps:
- Right-click on an empty area of the taskbar.
- Select “Taskbar settings” from the context menu.
- In the “Taskbar location on screen” section, click on the dropdown menu and choose “Top”.
- The taskbar will automatically move to the top of the screen.
2. To the Left
Alternatively, if you want the taskbar on the left side of your screen, follow these instructions:
- Right-click on an empty area of the taskbar.
- Select “Taskbar settings” from the context menu.
- In the “Taskbar location on screen” section, click on the dropdown menu and choose “Left”.
- The taskbar will now be positioned on the left side of your screen.
3. To the Right
Lastly, if you find it more convenient to have the taskbar on the right side of your screen, here’s what you need to do:
- Right-click on an empty area of the taskbar.
- Select “Taskbar settings” from the context menu.
- In the “Taskbar location on screen” section, click on the dropdown menu and choose “Right”.
- Your taskbar will be moved to the right side of your screen.
By following these simple steps, you can easily customize the position of your taskbar on a laptop. Experiment and find the position that works best for your workflow and personal preferences. Happy taskbar customization!
2. Adjusting taskbar size

Customizing the taskbar size on your laptop can greatly enhance your user experience. Here are a few steps to adjust the size of your taskbar:
-
Right-click on an empty area of the taskbar to open the context menu.
-
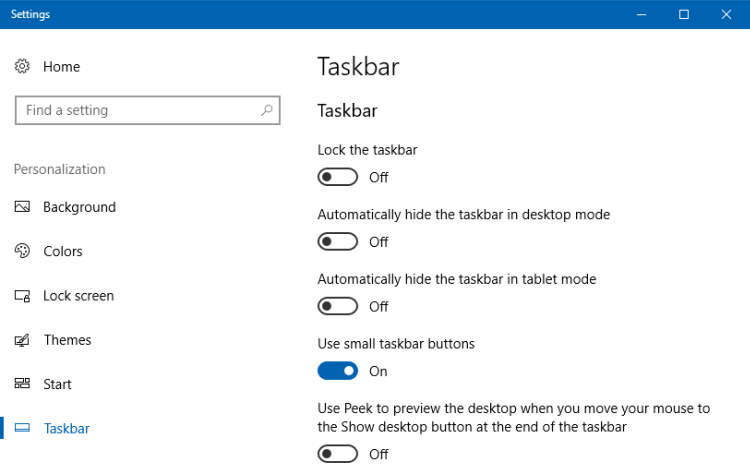
Select the “Taskbar settings” option from the menu to open the Taskbar settings window.
-
In the Taskbar settings window, locate the “Taskbar size” section.
-
Use the slider provided to adjust the size of the taskbar to your preference. Moving the slider to the right will make the taskbar larger, while moving it to the left will make it smaller.
Note: You can also enable the “Use small taskbar buttons” option if you want to further reduce the size of the icons on the taskbar.
-
Once you have adjusted the size to your liking, close the Taskbar settings window.
By following these simple steps, you can easily customize the size of your laptop’s taskbar and make it more convenient for your workflow.
3. Adding or removing taskbar icons
The taskbar on your laptop allows you to quickly access your favorite apps and programs. However, sometimes you may want to customize the icons displayed on the taskbar to suit your needs. Here’s how you can add or remove taskbar icons:
Add taskbar icons
To add icons to the taskbar, follow these steps:
- Right-click on an empty area of the taskbar.
- Select “Taskbar settings” from the context menu.
- In the “Taskbar settings” window, scroll down to the “Notification area” section and click on “Select which icons appear on the taskbar”.
- In the next window, enable the toggle switch for the icons you want to add to the taskbar.
- Once you have selected the desired icons, close the settings window. The icons will now appear on your taskbar.
Remove taskbar icons
If you want to remove icons from the taskbar, here’s what you need to do:
- Right-click on the icon you want to remove.
- Select “Unpin from taskbar” from the context menu.
- The icon will be removed from the taskbar immediately.
By customizing the taskbar icons on your laptop, you can have easy access to your frequently used programs and keep your desktop clutter-free. Experiment with different combinations of icons to find the setup that works best for you.
Conclusion
In conclusion, customizing the taskbar on your laptop can greatly enhance your productivity and overall user experience. By personalizing the taskbar to suit your preferences and workflow, you can easily access your favorite apps, multitask efficiently, and stay organized.
Whether it’s rearranging the icons, adding or removing toolbars, or tweaking the taskbar settings, there are various customization options available to make the taskbar work for you. This level of customization allows you to have a personalized and efficient workspace, tailored to your specific needs.

