In today’s digital age, it is crucial to keep our laptops protected so that we can avoid any unfortunate incidents that may lead to data loss or system failure. One effective way to safeguard our laptops is by creating a system restore point. This article will guide you through the steps on how to create a system restore point on your laptop, ensuring that you have a backup to rely on whenever necessary.
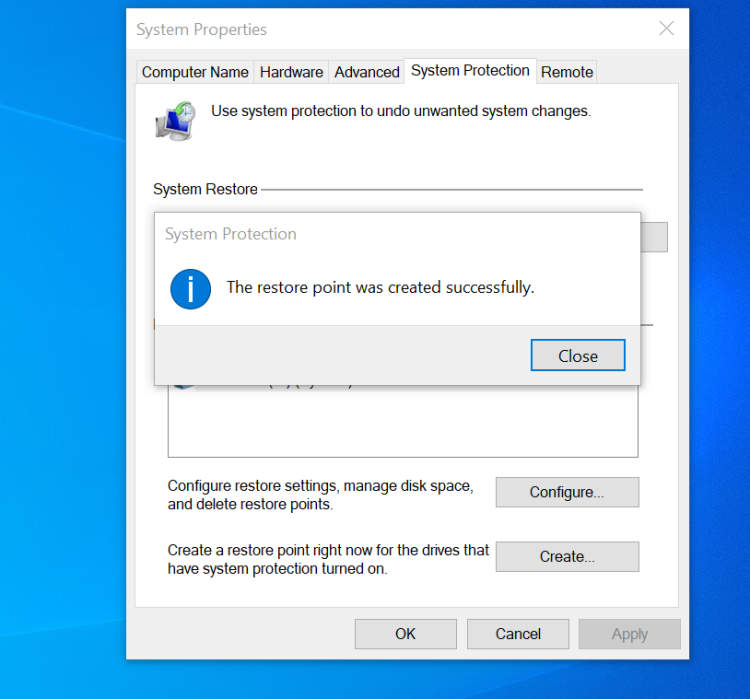
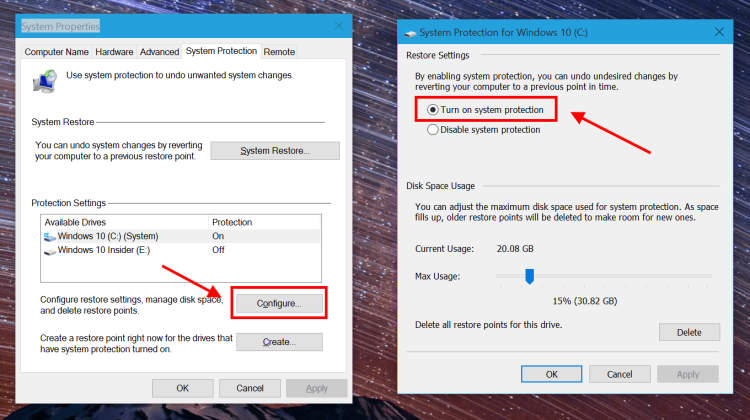
To begin, you need to access the System Protection settings on your laptop. This can usually be found by searching for “System Protection” in the Windows search bar. Once you have opened the System Protection window, select the drive that you want to create the restore point for. It is recommended to choose the drive where your operating system is installed, typically the C: drive. After selecting the drive, click on the “Create” button, and you will be prompted to provide a name for the restore point.
The Importance of System Restore Points
System restore points are an essential feature of any laptop or computer system. They serve as a safeguard that allows you to revert your system back to a previous state in case of any software or system issues. Here are several reasons why system restore points are important:
1. Recovery from System Failures
System failures can occur unexpectedly and cause a wide array of issues, such as crashes, corrupted files, or malfunctioning software. With system restore points, you can easily roll back your system to a stable state before the failure occurred, minimizing downtime and potential data loss.
2. Protection Against Malware
Malware infections can wreak havoc on your laptop’s performance and compromise your data security. By regularly creating system restore points, you can isolate and undo any changes made by malicious software, effectively removing the threat and restoring your system’s integrity.
3. Safe Software and Driver Installations
When installing new software or updating drivers, there is always a risk of compatibility issues or unintended consequences. With system restore points, you have the peace of mind knowing that you can revert your system back to its pre-installation state with just a few simple steps, eliminating any potential problems.
4. Testing New Configurations
System restore points also come in handy when experimenting with system configurations, such as modifying settings, trying different software, or making changes to the registry. If the changes lead to undesirable outcomes, you can easily go back to a restore point where your system was working optimally.
5. Easy Troubleshooting
When encountering issues with your laptop, system restore points can serve as a valuable troubleshooting tool. By rolling back the system to a known working state, you can quickly determine if the problem is caused by software changes or if it’s related to other hardware issues.
In conclusion, system restore points are a crucial aspect of maintaining a healthy and reliable laptop system. By regularly creating and utilizing restore points, you can protect yourself from system failures, malware infections, and potential software issues, ensuring a smoother and more secure computing experience.
Step-by-Step Guide: Creating a System Restore Point on a Laptop

In this article, we will walk you through the process of creating a system restore point on your laptop. This can be a useful way to safeguard your files and settings, allowing you to easily revert back to a previous state if something goes wrong with your system.
Step 1: Accessing the System Protection Settings
The first step is to access the System Protection settings on your laptop. To do this, go to the Control Panel and search for “System”. Click on the “System” option that appears and then select “System Protection” from the left-hand menu.
Step 2: Creating a System Restore Point
Once you are in the System Protection settings, click on the “Create” button to create a new system restore point. You will be prompted to enter a description for the restore point. It is recommended to use a descriptive name that will help you identify it later.
Step 3: Confirming the System Restore Point
After entering a description, click on the “Create” button to confirm the creation of the system restore point. The process may take a few minutes, depending on the size of your system and the amount of data being saved.
Step 4: Verifying the System Restore Point
Once the system restore point is created, you can verify its existence by going back to the System Protection settings. In the “Protection” tab, you should see a list of available restore points, including the one you just created.
Step 5: Restoring Your System
If you ever need to restore your system to a previous state, simply go back to the System Protection settings and click on the “System Restore” button. Follow the prompts to select the restore point you want to use and initiate the restoration process.
Conclusion
Creating a system restore point on your laptop is a straightforward process that can save you from potential headaches in the future. By following the step-by-step guide provided in this article, you can easily create and manage system restore points to protect your files and settings.
Tips and Tricks for Managing System Restore Points
System restore points are essential for maintaining the stability and functionality of your laptop’s operating system. They allow you to revert your system back to a previous state if any issues or errors occur. To help you effectively manage your system restore points, here are some valuable tips and tricks:
1. Regularly Create System Restore Points
Make it a habit to create system restore points regularly, especially before making any significant changes to your laptop, such as installing new software or drivers. This will provide you with a safety net in case something goes wrong.
2. Give Your Restore Points Descriptive Names
Instead of using the default naming convention, which typically includes a combination of date and time, consider giving your restore points descriptive names that indicate the reason for creating them. For example, “Before Software Installation – [Software Name].” This will make it easier for you to identify the purpose of each restore point.
3. Limit the Number of Restore Points
While system restore points are undoubtedly useful, having too many of them can consume a significant amount of disk space. It is recommended to keep a reasonable number of restore points, such as three to five, and periodically delete older ones as they become less relevant.
4. Schedule Automatic Restore Point Creation
To ensure that you always have recent restore points available, consider setting up an automatic schedule for creating them. This way, you won’t have to rely solely on manual creation and can have peace of mind knowing there are up-to-date restore points available when needed.
5. Check Restore Point Status and Disk Space Usage
Regularly check the status of your restore points and monitor the disk space they are utilizing. This will help you identify any issues, such as failed restore point creation or excessive disk space consumption, allowing you to take appropriate actions to address them.
6. Use System Restore in Safe Mode
If you encounter problems that prevent your laptop from booting normally, you can access the system restore options in safe mode. Safe mode starts your laptop with minimal drivers and services, providing a more stable environment for restoring your system to a previous point.
7. Backup Important Files Before Restoring
Before initiating a system restore, it’s crucial to back up any important files or data that you don’t want to lose. While system restore mainly affects system settings and files, it’s always better to be safe and have your valuable data securely backed up.
8. Keep Your Antivirus and Security Software Updated
As a best practice, ensure that your antivirus and security software is always up to date. This will help protect your laptop from potential threats that could compromise the integrity of your system restore points.
By following these tips and tricks, you can effectively manage your system restore points and ensure your laptop stays in optimum condition. Remember, system restore points are a valuable tool in troubleshooting and resolving issues, so don’t underestimate their importance!
Conclusion
Creating a system restore point on your laptop is an essential step to ensure the safety of your files and operating system. It allows you to restore your laptop to a previous stable state in case of any issues or mistakes. By following the simple steps outlined in this article, you can easily create a system restore point and have peace of mind knowing that your laptop is protected.
In summary, to create a system restore point on your laptop, start by accessing the System Protection settings. Then, select the drive where you want to create the restore point and click on the “Create” button. Give a descriptive name for the restore point and click “Create” again to initiate the process. Once completed, your laptop will have a restore point that you can use in case of emergencies. Remember to regularly create new restore points to ensure that you have the most up-to-date backup available.

