

Firewall settings are essential for ensuring the security and safety of your laptop. In this article, we will guide you on how to enable and configure firewall settings on your laptop to protect your device from potential threats and unauthorized access.
Firstly, it is important to understand that a firewall acts as a barrier between your laptop and the internet, monitoring incoming and outgoing network traffic. To enable the firewall on your laptop, navigate to the Control Panel and select the “System and Security” option. From there, click on “Windows Defender Firewall” and choose “Turn Windows Defender Firewall on or off.” Once enabled, your laptop will have an added layer of protection against malicious software and unauthorized connections.
Introduction
Protecting your laptop from malicious online threats is essential to safeguard your personal and sensitive information. One effective way to enhance your laptop’s security is by enabling and configuring firewall settings. In this article, we will guide you through the step-by-step process of enabling and configuring firewall settings on your laptop.
Enabling Firewall Settings on a Laptop
Learn how to enable and configure firewall settings on your laptop for enhanced security.
Why Firewall Settings Matter
Firewall settings act as a protective barrier between your laptop and potential threats from the internet. By enabling and configuring the firewall, you can control which applications and services can access your network connection.
Step-by-Step Guide to Enable Firewall Settings
Follow these easy steps to enable and configure firewall settings on your laptop:
- Open the Windows Security Center by clicking on the Start menu and typing “Windows Security Center” in the search bar.
- Click on the “Firewall & Network Protection” option.
- Choose “Private Network” or “Public Network” based on your connection type.
- Toggle the switch to turn on the firewall for the selected network.
- Review and adjust the firewall settings to suit your needs.
- Click “Apply” to save the changes.
Configuring Firewall Settings
After enabling the firewall, it’s important to configure it according to your requirements:
- Allow or block specific applications from accessing the internet.
- Configure inbound and outbound traffic rules.
- Set up exceptions for certain apps or services.
- Regularly update the firewall settings to stay protected.
Additional Tips for Firewall Security
Here are some additional tips to enhance your firewall security:
- Keep your firewall software up to date by installing the latest updates from the manufacturer.
- Enable notifications to be alerted about any suspicious activities.
- Regularly scan your laptop for malware and viruses.
- Disable unnecessary network protocols and services.
- Consider using a hardware firewall for added protection.
By following these steps and implementing the necessary configuration, you can ensure that your laptop is well-protected against potential threats on the internet.
Configuring Firewall Settings on a Laptop
Firewalls are essential security measures for any computer, including laptops. They help protect your system from unauthorized access and potential threats online. To ensure your laptop is well-protected, follow these steps to enable and configure firewall settings.
1. Understanding Firewalls
Before diving into the configuration process, it’s important to understand what a firewall is and how it works. In simple terms, a firewall acts as a barrier between your computer and the internet, filtering incoming and outgoing network traffic. It analyzes data packets and allows or blocks specific connections based on pre-defined rules.
2. Accessing Firewall Settings
To configure firewall settings on your laptop, start by accessing the Windows Firewall settings. Open the Control Panel and navigate to the “System and Security” section. Click on “Windows Firewall” to access the main configuration window.
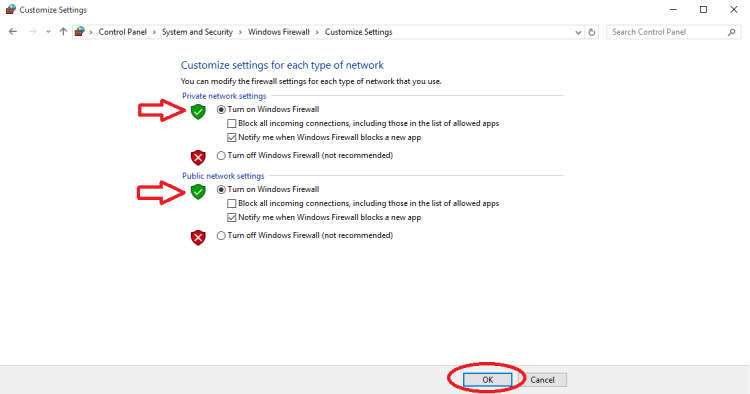
3. Enabling the Firewall
Upon accessing the Windows Firewall settings, ensure it is enabled. If not, click on the “Turn Windows Firewall on or off” link on the left-hand side. Check the box next to “Turn on Windows Firewall” and click “OK” to enable the firewall.
4. Adjusting Firewall Rules
By default, the firewall has predefined rules to protect your system. However, you may need to adjust these rules to suit your specific requirements. To do this, click on “Advanced settings” in the left-hand sidebar and select “Inbound Rules” or “Outbound Rules” to make changes accordingly.
5. Creating Custom Rules
If you have specific applications or services that require inbound or outbound connections, you can create custom rules. Click on “New Rule” to launch the rule creation wizard. Follow the prompts and select the appropriate settings for the application or service you want to allow.
6. Regularly Update Firewall
It is crucial to keep your firewall software up to date to ensure the best protection. Check for updates regularly and install them to receive the latest security patches and enhancements.
7. Test Firewall Effectiveness
Once you have configured the firewall settings on your laptop, it’s recommended to test its effectiveness. Use online firewall testing tools to check if your firewall is functioning correctly and blocking unwanted connections.
By following these steps, you can enable and configure firewall settings on your laptop, enhancing your system’s security and protecting it from potential threats.
Conclusion
Enabling and configuring firewall settings on your laptop is crucial in ensuring the security of your device and protecting it from potential threats. By following the steps outlined in this article, you can easily set up and customize your firewall settings to meet your specific needs.
First, it is important to enable the built-in firewall on your laptop. This provides a basic level of protection by monitoring and controlling incoming and outgoing network traffic. Once enabled, you can then configure the firewall settings to define which applications and services are allowed or blocked. This allows you to have better control over your network connections and safeguard against malicious activities.