Virtual desktops provide users with a versatile and efficient way to organize their workspaces and increase productivity. Whether you’re a student, a professional, or someone who loves to multitask, setting up and using virtual desktops on your laptop is a game-changer. In this article, we will guide you through the process of setting up and using virtual desktops, so you can take advantage of this handy feature and make the most out of your laptop’s screen real estate.
Setting up virtual desktops is a breeze on most modern laptops. You can easily create multiple desktops and switch between them with a few simple clicks. Once you have set them up, virtual desktops enable you to keep your different applications and tasks organized in separate workspaces, eliminating clutter and reducing distraction. Whether you want to separate your work-related applications from your personal ones or group similar tasks together, virtual desktops provide a seamless way to do so. So, let’s dive into the world of virtual desktops and unlock the potential of your laptop’s multitasking capabilities.
Introduction
In today’s fast-paced digital world, multitasking has become a necessity. Whether you are a student, professional, or simply someone who loves to stay organized, virtual desktops can be a game-changer. With virtual desktops, you can create multiple workspaces on your laptop, allowing you to separate your tasks and applications effectively.
Setting up Virtual Desktops

Virtual desktops provide a convenient way to organize and multitask on your laptop. Here’s a step-by-step guide on how to set up and use virtual desktops:
Step 1: Accessing Virtual Desktops
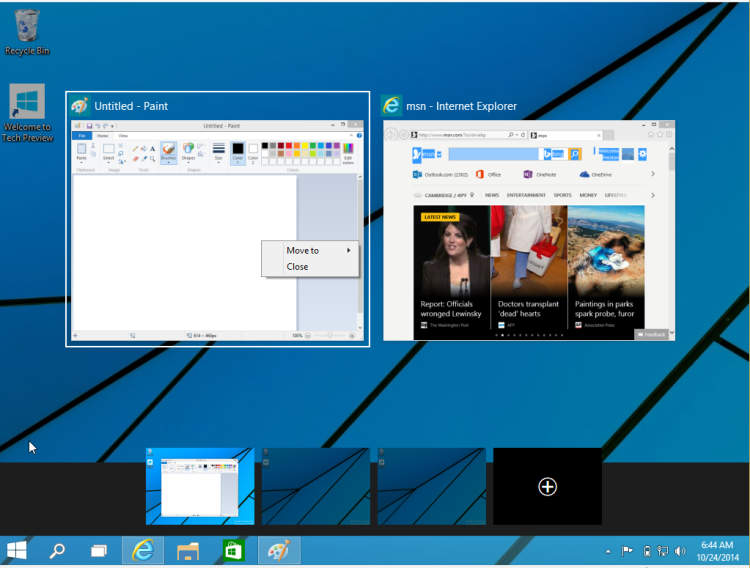
To access virtual desktops on your laptop, simply press the Windows key + Tab key simultaneously. This will open the Task View interface where you can see all your open windows and create new virtual desktops.
Step 2: Creating a New Virtual Desktop
Once in the Task View interface, you will see a button labeled “New desktop” on the bottom right corner of the screen. Click on this button to create a new virtual desktop. You can create as many virtual desktops as you need.
Step 3: Switching Between Virtual Desktops
To switch between virtual desktops, use the Windows key + Ctrl + Left/Right arrow key. This will allow you to move seamlessly between different desktops and access different sets of apps and windows.
Step 4: Moving Windows Between Virtual Desktops
If you want to move a specific window from one virtual desktop to another, first, open the Task View interface, and then right-click on the desired window. From the context menu, select “Move to” and choose the virtual desktop you want to move the window to.
Step 5: Closing Virtual Desktops
If you no longer need a specific virtual desktop, you can close it by opening the Task View interface, hovering over the desktop you want to close, and clicking on the “X” button that appears in the top right corner of the desktop thumbnail.
Tips for Using Virtual Desktops
- Organize your virtual desktops by specific tasks or projects to enhance productivity.
- Use keyboard shortcuts for a faster and more efficient virtual desktop experience.
- Customize your virtual desktop backgrounds to easily distinguish between different desktops.
- Experiment with different apps and windows placement to find your preferred workflow.
By following these steps and tips, you’ll be able to set up and use virtual desktops on your laptop like a pro. Start maximizing your productivity today!
[Using Virtual Desktops]
Virtual desktops have become an essential tool for maximizing productivity on laptops. By utilizing this feature, you can organize your workspaces effectively and switch between different tasks seamlessly. Here is a step-by-step guide on how to set up and use virtual desktops on your laptop:
Step 1: Accessing Virtual Desktops
To access virtual desktops, you need to click on the Task View button located on the taskbar or press the Windows key + Tab simultaneously. This will open the Task View interface, where you can see your current desktop and add more virtual desktops.
Step 2: Creating New Virtual Desktops
In the Task View interface, you will find a “New Desktop” button at the bottom right corner. Click on it to create a new virtual desktop. You can continue adding as many virtual desktops as you need.
Step 3: Switching between Virtual Desktops
To switch between virtual desktops, you can either click on the desktop thumbnail in the Task View interface or use the keyboard shortcut Windows key + Ctrl + Left/Right Arrow. This will allow you to navigate between your different workspaces effortlessly.
Step 4: Moving Apps between Virtual Desktops
If you want to move an app from one virtual desktop to another, you can do so by dragging and dropping the app window to the desired desktop in the Task View interface. This way, you can keep related apps together and maintain a clutter-free workspace.
Step 5: Closing Virtual Desktops
To close a virtual desktop, you can access the Task View interface and hover over the desktop thumbnail you wish to close. A small “X” button will appear in the top right corner of the thumbnail. Simply click on it to close the virtual desktop.
Using virtual desktops on your laptop can significantly enhance your multitasking capabilities and help you stay organized. Now that you know how to set up and use virtual desktops, you can take full advantage of this feature to optimize your workflow.
Conclusion
In conclusion, setting up and using virtual desktops on a laptop can greatly enhance productivity and organization. By creating multiple virtual desktops, users can easily switch between different tasks and keep their workspace clutter-free. This feature is especially beneficial for those who need to multitask or work with different applications simultaneously.
In addition, virtual desktops offer flexibility and customization options. Users can personalize each desktop by organizing applications, files, and windows according to their preferences. This allows for a more tailored and efficient working environment.

